Chem Biography Platform Usage Instructions
>> Pop-up full table of contents in separate window <<
Chapter 1. Introduction
Table of Contents
Overview
The Chem Biography (CB) application utilizes a web based interface. It is accessed via the main menu page, http://{server}/chembiography.php, with the server part of the address replaced by the name assigned to the computer server as part of the initial setup. While CB is designed to function across all common internet browsers, it is optimized for Firefox / Mozilla which can be freely downloaded; use of CB with Firefox is recommended.
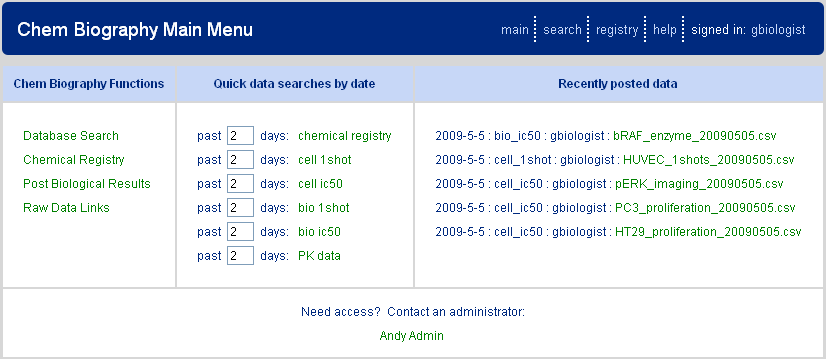
Accessing the main menu page (Figure 1.1, “Chem Biography Main Menu”) provides access via web links (left panel) to the three primary components of the CB application: CB database searching, chemical registry, and biological data upload. Each of these components will be described in more detail below. Additionally, on the CB main page is a middle panel that provides predefined quick searches, by data type, of recently added data and a right panel allowing linking to the most recently uploaded biological results. One of the intentions of the CB architecture is for the user to always have facile access to the most recent data generated.
Data Organization (please read)
It is beneficial for all users to understand, at a basic level, how data are stored and managed with the CB system. The objective is a relatively simple system that nonetheless provides high flexibility and facile access to the data. The central principles employed are:
-
Data are organized in a “molecule centric” manner with the molecular structure and supporting chemical and biological information forming the units that make up the database.
-
Data are subdivided into scientifically logical tables termed “data types”. Examples of common data types would be chemical registry, cellular IC50’s, and PK results. As will be described below, querying of the database begins by defining which data type the user wishes to search against. Note that chemical registry is a required data type as part of the CB system to support the molecule centric organization of data
-
Each data type is further subdivided into “fields”. A field has a corresponding name (“field name”) and is populated with experimental data or related information. Examples of field names would be molecular weight and notebook for chemical registry table; assay type and IC50 for cellular IC50 table; AUC and T1/2 for PK results table. Querying the database also involves selecting a field to search against.
-
All data types and their associated fields, including the chemical registry and any biological data types, are defined and managed by the organization’s administrator(s) as part of a central “concordance” file. This file is constructed at the time of initial set of the CB software and is highly customizable (templates for typical data types are provided) and may be flexibly modified as the organization’s needs develop or evolve. The different CB applications all reference this concordance file as an essential part of their functioning for storing, retrieving, and viewing research data
Chapter 2. Chemical Registry
Table of Contents
Setup Information
As mentioned above the chemical registry table defines the data architecture scaffold in CB. Five fields are mandatory and required: registry id, molecular weight, formula, chirality, and SMILES. Values for these fields are automatically computed by the application during a registration operation and are provided as part of the default CB setup. Other desired fields (notebook, chemist, etc.) may be added as needed as described in the administration section. Additionally, the format of registry id field (e.g. AB-1234, AB001234-1, AB-01234.1 etc.) is customizable. Chem Biography staff will work with you during administrative setup to define the format you desire, and what if anything your registry id might encode (for example a batch number or salt code).
Usage
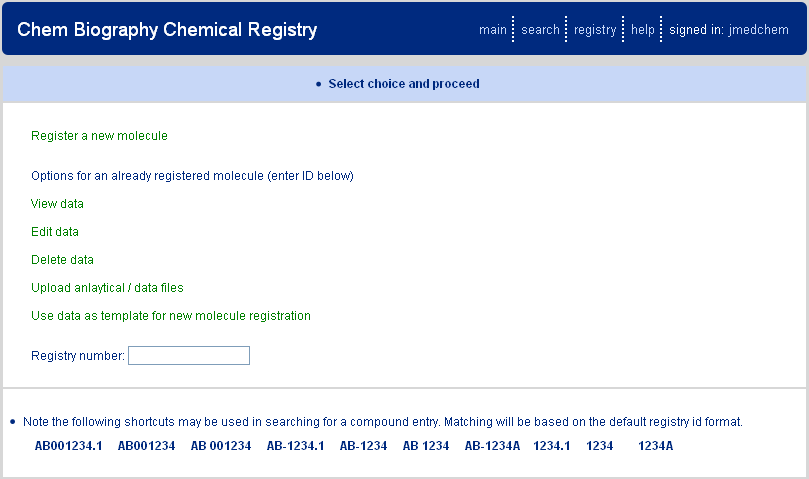
Accessing the chemical registry presents the page show above Figure 2.1, “Chemical Registry Front Page”. A series of options are presented, each of which is accessed via the web link provided. At the top of the page is the option for registering a new molecule. Next are options for viewing, editing, or deleting, an already registered molecule; these options require entry of an existing registry ID in the "Registry Number" text box. The final two features are utilized to either upload supporting data files for a registered molecule or to use a registered molecule as a template for a new molecule registration.
Registering a new molecule
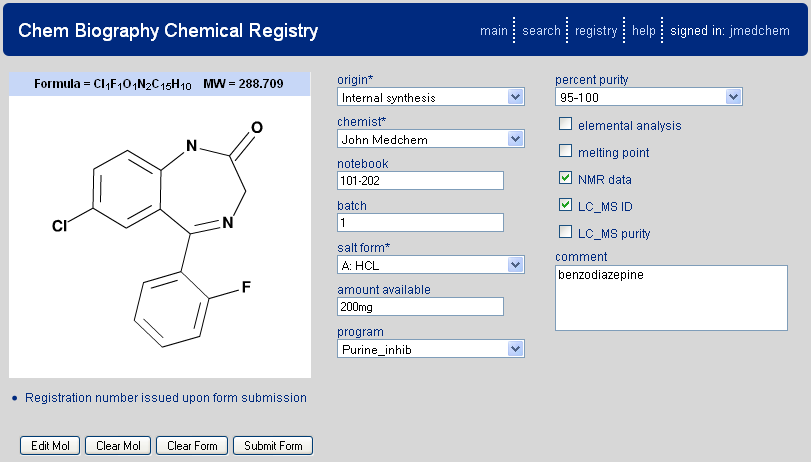
Selection of this option presents the user with a web form to enter the appropriate data for a chemical registration. An example populated form is shown in Figure 2.1, “Chemical Registry Front Page”. At the left of the registry form is a chemical structure drawing tool (J2A chemical editor) which has been developed as part of the CB application (described below). In addition to the drawing tool the user will find a series of form fields. These fields are specified as part of the CB setup and will likely include components such as medicinal chemist, notebook page, project the compound was synthesized for, etc. The fields may also occur as any of the standard web form types (drop down menu, text field, check box, text area). Asterisks by a field name denote that the field is required for registration to proceed. A registry entry's accompanying fields and types are discretionary and shall be modified to suit your organization's needs during initial setup of your system.
Registration and assignment of Registry ID
Correct assignment of registry ID is an important step in research data management. The CB platform algorithmically performs this step following submission of the registry form. Several things go on “under the hood” to ensure appropriate assignment:
-
Ascertaining uniqueness of the molecule (has an identical structure been registered before) including calculations related to chirality.
-
Integrating with instructions that determine how different batches and salt forms are to be handled (e.g. do they receive separate ID’s or the same ID with a different version). Salt form and batch handling are again part of the organization’s setup preferences; CB is designed to be as flexible as possible with regard to how these properties are handled.
-
CB is also designed to permit registry based distinctions for molecules that are synthesized internally or acquired. We offer an "origin" field that can drive the corresponding registry id format (internal synthesis vs. commercially acquired for example).
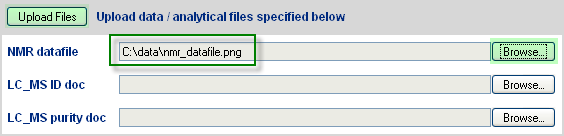
Following submission of the form a registry ID is provided as shown in Figure 2.3, “Example Registered Molecule”. Once this has occurred the user may then also choose to upload any supporting data (e.g. LCMS or NMR spectra) and these data will then be associated with the registered molecule and retrievable via an html link (as indicated by green text for the field name – Figure 2.4, “Upload Analytical Data Files”). Types of supporting data allowed are part of the registry setup.
Figure 2.3. Example Registered Molecule
Example registered molecule. Data is summarized and a registry ID is assigned.
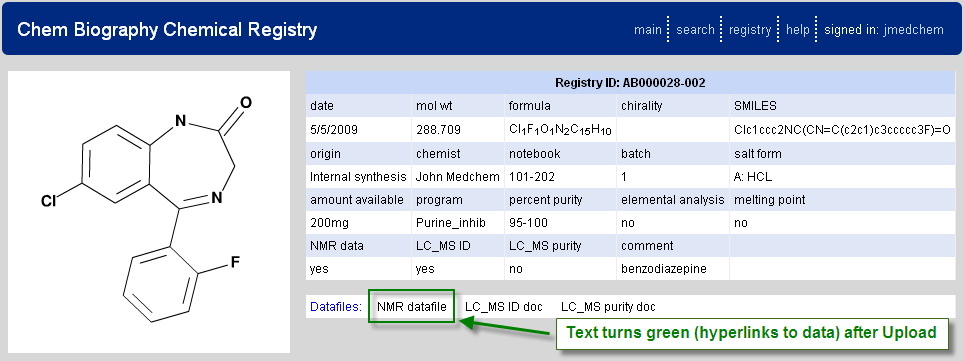
Figure 2.4. Upload Analytical Data Files
The user may then upload supporting analytical data files, which following upload, will link as denoted by green hypertext.

Viewing, Editing, or Deleting a Registered Molecule
Once a molecule is registered, it may be viewed or subsequently modified or deleted. From the main registry page, enter the ID and select the desired operation. Note that shortcuts in typing may often be used for convenience (e.g. entering 2 will be expanded to AB-002 or whatever the formal registry id format has been set to). Proceeding will pull up all compounds matching the registry id query. If a version is not specified (e.g. there are AB-0002.1 and AB-0002.2 but only AB-0002 is entered), then both possibilities are displayed. When editing or deleting, select the radio button (edit example is shown) above the desired entry and then the continue button at the bottom of the web page.

Uploading analytical data
As noted and described above for new molecule registration, once a molecule is registered, supporting data may then be uploaded and linked to it. This feature is also available from the main registry page.
Use an existing molecule template for new entry
Often when working in a chemical series, multiple structurally related analogs are synthesized and they may also have common features such as project name. To facilitate entering of data and drawing, the template feature allows one to populate the new molecule registration form with all the data from a previously registered molecule (note that one useful feature of this function is assuring that related molecules are drawn in a standard orientation, thereby possibly facilitating SAR analysis). Once in the new registration from, change the fields that need to be edited (e.g. notebook page) and register as before. The molecule used as the template is in no way affected by this procedure.
Chapter 3. Structure Drawing
Table of Contents
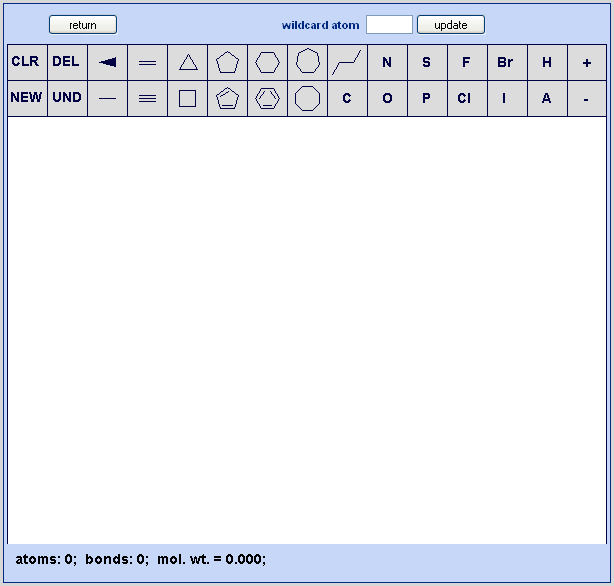
Drawing is accomplished via a java based drawing tool, the J2A chemistry editor, which was developed as part of the Chem Biography package. The intent was to produce an editor that is functional and straightforward to use. CB welcomes feedback on additional features that users would desire. The main drawing page appears as shown below in Figure 3.1, “J2A Chemical Editor”.
Figure 3.1. J2A Chemical Editor
Chem Biography’s drawing tool. The editor contains a main drawing panel with drawing options above and an information bar below.
Starting Off
All drawing is done via use of the left mouse button. After initiating the drawing tool the user will be either in a new molecule mode if no structure has previously been drawn or an edit molecule mode if a structure already exists. Once anything is drawn in the drawing panel, the user now transitions into edit molecule mode. The distinction between new and edit mode is that in edit mode one can only build off an existing atom or bond whereas in new mode a structure unconnected to any existing ones may be initiated and connections to existing molecules are deliberately prevented. A new unconnected structure may be added to existing ones at anytime via selection of the NEW option. During all drawing, a running account of atoms, bonds, molecular weight and formula (with both implicit and explicit hydrogens) is maintained.
Anytime an option is selected it will be highlighted in green. When building onto an existing molecule, two situations will consistently be encountered. One is when the cursor is over an existing atom indicating intent to modify or build off this atom (atom typing, bond addition, ring addition). Here the user will see a blue square, as shown, surrounding a particular atom indicating it is the current active atom. The second is when the cursor is over an existing bond (midpoint of the bond) indicating intent to modify or build off this bond (bond typing, fused ring addition). Here the user will see a blue circle over the midpoint of the bond.
Bond Drawing

Options are provided for drawing single, double, triple and chiral bonds. If initiating a new molecule, selection of one of the bond options and then clicking in the drawing panel will place the appropriate bond. If building onto an existing molecule and clicking an atom, a bond of appropriate type will be grown from the selected atom. Note that anytime a bond is being grown, the user can, instead of clicking and releasing in the drawing panel, hold the left mouse button down and drag the cursor. What this procedure will do is allow custom orientation of the bond as opposed to default grow rules (120 degree angles for single and double or 180 degree angles for triple bonds). Other particular features are:
Single Bond: clicking on an existing bond when the single bond option is selected will cycle that bond incrementally (double, triple, back to single).
Double bond: clicking on an existing double bond when the double bond option is selected will cause the “second” bond of the double bond to reorient its position to the opposite side of first bond. One use of this feature would be to alter the appearance of a bridgehead double bond in a polyaromatic ring system.
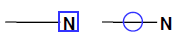
Chiral bond: Repeated clicking on an existing bond when the chiral bond option is selected will toggle that bond through 4 options comprising wedge up or down and direction of chirality.
Long distance bonds / connecting separate structures: To form a bond between two atoms that are outside the standard bond length, for example as might occur when connecting to distinct molecules or rendering a bycyclic ring or natural product, select the first atom but keep the left mouse pressed down and drag to the second atom (now highlighted by the blue square) and then release.
Ring Drawing
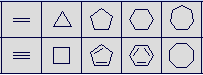
Standard rings from 3 to 8 atoms in size are available for use as templates. They may be used to build off an existing atom or fused onto an existing ring. For building off an existing atom, the atom must have no more than one current bond. The rings templates may also be used to initiate a structure when in new molecule mode.
Atom Typing
A panel of standard medicinal chemistry atom types is provided for use in structure drawing. Additionally, a “wildcard” atom functionality is available to enable inputting any atom as needed. Select the desired atom type and then label the atom on the structure. The atom may be reverted to an implicit carbon by repeating this process (e.g. to turn an oxygen back to carbon, click on the O in the menu then click the oxygen in the structure). As noted, carbons are implicit but may be specifically labeled with the carbon from the menu. Hydrogen’s are normally calculated but may also be made explicit via labeling. To use the wildcard function, enter the desired type (do not use charges here – use the charge function below) in the wildcard atom text box and then click the update button. The wildcard atom will then be reflected in the menu (shown here as A in the figure above).
Charges

Charges are assigned via selecting the + or – menu objects and then clicking the desired atom in the drawing structure. Repeated clicking of the same atom will increment the formal charge to the magnitude desired. To reduce or remove a charge from an atom, select the opposite sign and click on the atom as many times as needed.
General Features

NEW: Draw a new molecule. Selection of the NEW option permits drawing of a structure disconnected from any already drawn structure. After selecting NEW option, immediately pick one of the drawing options and then click on an unoccupied portion of the drawing canvas to complete the action. Once the drawing is done, the NEW mode is automatically exited. This mode is the default when initiating the J2A chemistry editor and no molecule has been previously drawn.
CLR: Clear the drawing canvas. Selection of CLR removes all drawn structures from the canvas. It is a full delete and resets the drawing canvas to new molecule mode
DEL: Delete a bond or atom. After selecting the delete mode, click on specific atoms or bonds to delete them.
UND: Undo the last action. Selecting the undo mode cause the currently displayed structure(s) to revert to their state before the last drawing event.
Rotation / translation of molecules
When in edit mode drawn structures may be translated within the drawing canvas by selecting an unoccupied area within the drawing canvas and dragging the mouse cursor. The structure(s) will translate as the cursor moves. Similarly, performing the same action but also holding down the shift key will cause rotation of drawn structures.
Chapter 4. Database Search
Table of Contents
Overview
The Chem Biography database search application manages search, retrieval, and viewing of research data. It functions in one of three primary modes:
-
Input mode: This mode is used for building a query to search the Chem Biography database.
-
Search Results mode: This mode is used to execute a search and display returned results.
-
Edit Views mode: This mode is used to manage the users various views for displaying data returned from a search
Whenever the Chem Biography application is in use, it is always in one of these modes and the user can at any time transfer to an alternate mode via the top level menu commands. Generally, the idea is that one builds a query in input mode, runs a search (transitioning to results mode) to yield a set of compounds (registry ID's) that satisfy the search query. The data to be displayed for those compounds is controlled by the users currently selected view (view mode).
Input Mode
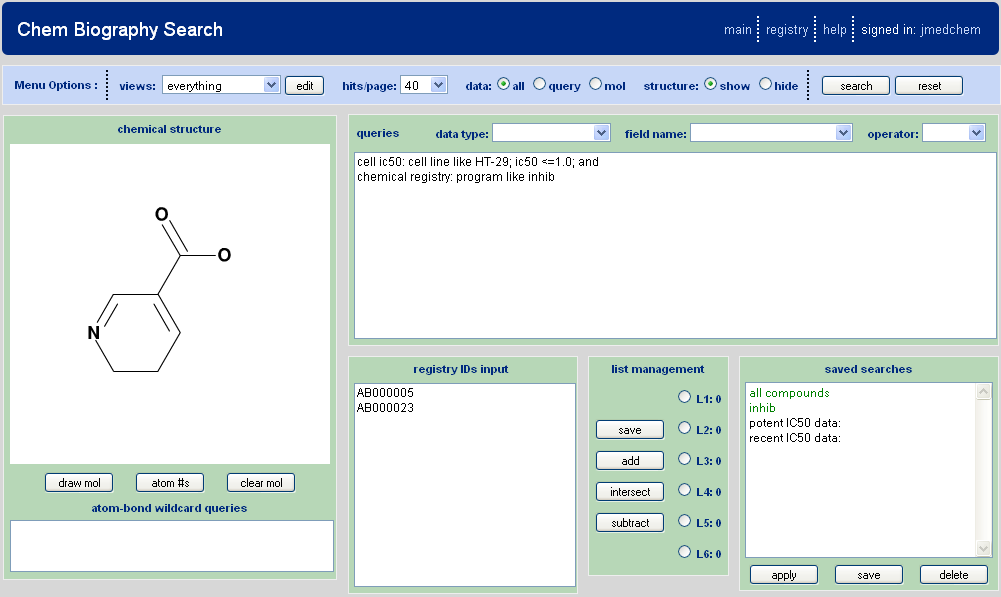
When entering the database search tool from the main menu, the user will be in the input mode and may begin to build queries. A populated search form might appear as shown in Figure 4.1, “Chem Biography Search Input Page”.
A search query is built using one of three mechanisms which may be combined. These mechanisms are described in the sections that follow and defined:
-
Chemical Substructure
-
Registry ID(s) Input
-
Data Query
Chemical Substructure Based Searching
On the left side of the query input page is the substructure drawing area. Draw the molecule using the J2A chemical editor as described in the drawing section. Additionally there is the capability for the use of wildcards, for both bonds and atoms, in the search.
Multiple Atom Types
-
First draw the molecule.
-
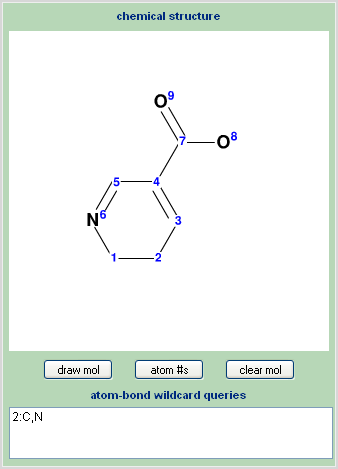
Use the “atom #’s” button to display the ID number assigned to each atom in the structure.
-
In the wild card text box use the ID numbers to reference atoms.
-
Add a colon after the ID number.
-
Add the desired allowed atoms separated by commas.
-
Use one wildcard per line.
-
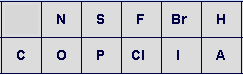
The letter A may be used to reference allowing all standard atoms at a certain position.
| allow carbon or nitrogen at position 1 | 1:C,N |
| allow nitrogen, oxygen, or sulfur at position 4 | 4:N,O,S |
| allow any atom at position 7 | 7:A |
Note that the atom numbering display feature is for informational purposes only and may be toggled on or off as desired with no affect on search results.
Bond Wildcards
Bond wildcards: Bond wildcards are handled by entering the ID numbers of the atoms in the bond, separated by a dash and followed by a colon and followed by the allowed bond types shown below.
| 1: single | 5: single or double |
| 2: double | 6: single or aromatic |
| 3: triple | 7: double or aromatic |
| 4: aromatic (note that aromaticity assigned) | 8: any |
| double bond between atoms at positions 1 and 2 | 1-2:2 |
| aromatic bond between atoms at positions 7 and 5 | 7-5:4 |
Registry ID Based Searching
Use the registry id textbox on the query input page to enter or paste in either individual Registry ID's or a list. Note that shortcut typing may be used and CB program will attempt to expand the typing to the correct registry ID format as defined in the CB setup. For example, all of the following would be acceptable shorthand for the registry ID, AB-001234.1.
| AB-001234.1 | AB-1234 | 1234 |
| AB-1234.1 | AB 1234 | 1234.1 |
Data Query Based Searching
Understanding how the data are stored is useful for knowing how to develop queries to search it. As noted above, data are organized and stored in tables (data types). Data tables are composed of experimental records with each record corresponding to one experimental result for one compound. For the chemical registry, there is typically one record per compound, but for other tables there are from 0 to many records per compound. Components of the experimental record are assigned to specific fields according to their field names (e.g. assay type or protein name or IC50).
Select from the different dropdowns in the query area. They will automatically load into the current query box. The only component that is required to be entered by typing is the actual value (e.g. the "0.200" part of "IC50 < 0.200" or the "Her2" part of "assay type like Her2"). However, you may type as much of the query as you want.
A simple query is composed of a data type followed by a colon followed by a field name condition followed by a semicolon. Multiple field name conditions may be used, each separated by a semicolon. A compound query consists of combining simple queries (now called sub-queries) using logic operators to connect them (and, or, not). Appropriate colon (":") and semi-colon (";") punctuation is essential.
| simple query | chemical registry: mol wt > 400; |
|---|---|
| simple query with multiple field names (implicit 'and') | chemical registry: mol wt > 400; program like PDGFR; |
| compound query | chemical registry: program like PDGFR; and |
| cell IC50 assays: assay like her2 |
Use "like" for string related queries (e.g. searching by assay name) and the >, =, < operators for numerical queries. Some data can be searched in either way i.e. "registry id > 000" or "registry id like AB- 110" both work. Note also that when using the “like” query, a value need not be supplied and this will have the effect of retrieving all data for the given data type and field name, i.e. it acts as a wild card search.
Date based queries should use the mathematical operators and the data should be in the format MM/DD/YYYY, e.g. 01/02/2009, or in the format YYYY-MM-DD, e.g. 2009-01-02.
If a search is attempted and the CB system detects an error in construction of the query it will attempt to inform the user of the nature of the error. Correct the query and re-execute the query.
Short hand registry IDs may be used as desired. The queries below are equivalent. The second shorthand query contains sub-strings ("reg" for "Chemical Registry" table name, and "id" for field "Registry ID") that allow mapping. As is apparent, queries are case insensitive.
| Chemical Registry: Registry ID like AB-00123; | reg: id like AB-10123; |
Combination Searches
For searches that combine a chemical substructure, registry IDs, and / or queries, the following logic rules apply. For a substructure search, it is always treated by an "and" operation in merging its results with either registry ID or query searches (in other words, all hit molecules must contain the substructure). For a combined registry ID and query search, the registry ID hit list is combined with the query search hit list according to the logic operator of the last sub-query. If no operator is given, "and" is the default
Saved Searches
In query input mode, at any time a query may be saved for future reuse. Just construct the query (chemical substructure, registry ID list, data query) and select save in the saved searches section of the INPUT page. To apply it at a later time, select in the textbox listing saved searches, and then select the apply button. Saved queries may also be deleted in a similar fashion. Default queries may be provided that are write protected.
More Data Query Based Search Examples
An important component of the CB querying architecture is that it is designed to allow searching individual experimental records while treating all the experimental records for a given compound as a block of data. This mechanism allows for a range of flexibility in the types of searches possible.
The easiest path to understanding the capabilities is by studying a set of examples. Consider the following results for two compounds stored in two main data type tables (Chemical Registry and Cell IC50 Assays) and allocated to several field names (Program, Mol Wt, IC50, Assay Type). Overall, observe that each sub-query is tested against all of a compound's individual experimental records for the specified data type. Any match adds the compound to a sub-query hit list that is stored. At the end, the sub-query hit lists are combined according to the logic operators (and, or, not) to yield a final results hit list for the query as a whole. As is shown, there is always only one data type table per sub-query line but there may be one or more field name test conditions
| Compound | Program | Mol Wt |
|---|---|---|
| AB-001 | gyrase | 350 |
| AB-002 | PDGFR | 425 |
| Compound | IC50 | Assay Type |
|---|---|---|
| AB-001 | 45 | Her2 inhibition |
| AB-001 | 0.175 | p-ERK |
| AB-002 | 0.015 | Her2 inhibition |
| AB-002 | 0.021 | PC-3 proliferation |
| AB-002 | 49.999 | p-ERK |
| Query (one sub-query per line) | Subquery Hit List | Total Hit List |
|---|---|---|
| chemical registry: mol wt > 400; | AB-002 | AB-002 |
| chemical registry: mol wt > 400; or | AB-002 | |
| chemical registry: program like gyrase; | AB-001 | AB-001, AB-002 |
| chemical registry: mol wt > 400; and | AB-002 | |
| chemical registry: program like gyrase; | AB-001 | null |
| chemical registry: mol wt > 400; program like PDGFR; | AB-002 | AB-002 |
| cell ic50 assays: assay like her2; | AB-001, AB-002 | AB-001, AB-002 |
| cell ic50 assays: assay like her2; ic50 < 0.02; | AB-002 | AB-002 |
| cell ic50 assays: assay like pc-3; ic50 < 0.02; | null | null |
| cell ic50 assays: assay like pc-3; and | AB-002 | |
| cell ic50 assays: ic50 < 0.200; | AB-001, AB-002 | AB002 |
| cell ic50 assays: ic50 > 0.100; ic50 < 0.200 | AB-001 | AB-001 |
| cell ic50 assays: ic50 > 0.100; and | AB-001, AB-002 | |
| cell ic50 assays: ic50 < 0.200 | AB-001, AB-002 | AB-001, AB-002 |
| chemical registry: program like PDGFR; and | AB-002 | |
| cell IC50 assays: assay like her2 | AB-001, AB-002 | AB-002 |
| chemical registry: program like PDGFR; or | AB-002 | |
| cell IC50 assays: assay like her2 | AB-001, AB-002 | AB-001, AB-002 |
| chemical registry: program like gyrase; or | AB-001 | |
| cell IC50 assays: assay like her2; IC50 < 0.020 | AB-002 | AB-001, AB-002 |
| chemical registry: program like gyrase; or | AB-001 | |
| chemical registry: program like PDGFR; and | AB-002 | |
| cell IC50 assays: assay like her2; IC50 < 0.200 | AB-002 | AB-001, AB-002 |
List Management
The lists feature is designed to allow combining of hit lists from multiple searches. Whenever a search is run in Chem Biography the results (registry ids for compounds that satisfy the query) are maintained as an active list denoted L1. However, there are up to five additional list arrays (L2-L6) that can be utilized to manage hit list results. These arrays work in conjunction with the registry ID text box and can be manipulated through one of four input buttons:
-
Save the contents of the L1 active list to the selected list (L2-L6).
-
Add the contents of the selected list (L1-L6) with the contents of the registry ID text box.
-
Intersect the contents of the selected list (L1-L6) with the contents of the registry ID text box.
-
Subtract the contents of the selected list (L1-L6) from the contents of the registry ID text box.
Usage
Choose a list by selecting one of the list ID radio buttons. Then select one of the four commands described above. For the add, intersect, and subtract commands, the registry ID text box will be updated to reflect the action. Intersect and subtract commands should logically only be used if there are already compounds in the registry ID textbox since otherwise a null list will be generated.
Example
Suppose one wanted to take the results of one search (search A) and subtract them from the results of a second search (search B).
-
Run search A and then return to the query page.
-
Select L2 radio button. Select Save. The hit list is now copied to L2 with the hit list total reflected.
-
Run search B and then return to the query page. Reset the form.
-
Select L1 radio button. Select Add. The registry ID's from search B will transfer to the Registry ID text box.
-
Select L2. Select Subtract. The results from search A, saved as L2, will be subtracted from the registry ID textbox.
Notes
The hit molecule total for any of the lists is indicated and clicking the list ID will open a window showing the component registry ID's.
Search Results Mode
Successful execution of a search will transfer the user to the search results page for analysis of data. An example results page appears below in Figure 4.3, “Chem Biography Search Results Detail”. At this point, the user can modify the display via a series of menu options and then refresh the view. The compound hit list – the output of a search - is always unchanged when displaying search results (with the exception of filtering) but the view may be completely altered to allow the user to analyze the data in a desired manner. This principle, using a search to define a compound hit list but then decoupling the data results view from the input query, is a central tenet of the CB design.
Altering the view is accomplished via menu options and the edit view mode both of which are described in detail below. The menu options also provide the capability to export data to pdf, csv, or text formats.
Structure Export
-
png: right click on the image after it is rendered to save it to an export png file
-
pdf: similar to the png option, the pdf may be saved as a file. An interesting option that users may not be aware of, but which is convenient for generating good quality images for pasting into doc’s and ppt’s, is the Adobe snapshot function. After rendering the pdf, if the snapshot tool is not already in the menu bar, then right click on the menu bar and select more tools => Snapshot tool (part of the select and zoom toolbar). Select this tool and then either 1) click and release on the pdf image to fully copy it or 2) click and drag to copy a portion of it. Note that the image can be scaled (and PDF’s vector scale) prior to copying. A useful tip is to scale prior to copying (integer multiples or fractions such as 50%, 75%, 200%, 400% are recommended) to get a high quality image for pasting.
-
Mol file: selecting this feature will bring up a text window containing the structure in mol format. Save it with a .mol suffix and it can be imported into Isis draw and Chemdraw programs or rendered by the Symyx Chime plug-in.
Substructure Search
Also below each structure rendered in the search results page is a subsearch feature that will revert the user back into the search query input mode and paste the structure into to the drawing editor. This is way to potentially quickly gain SAR info around a structure of interest.
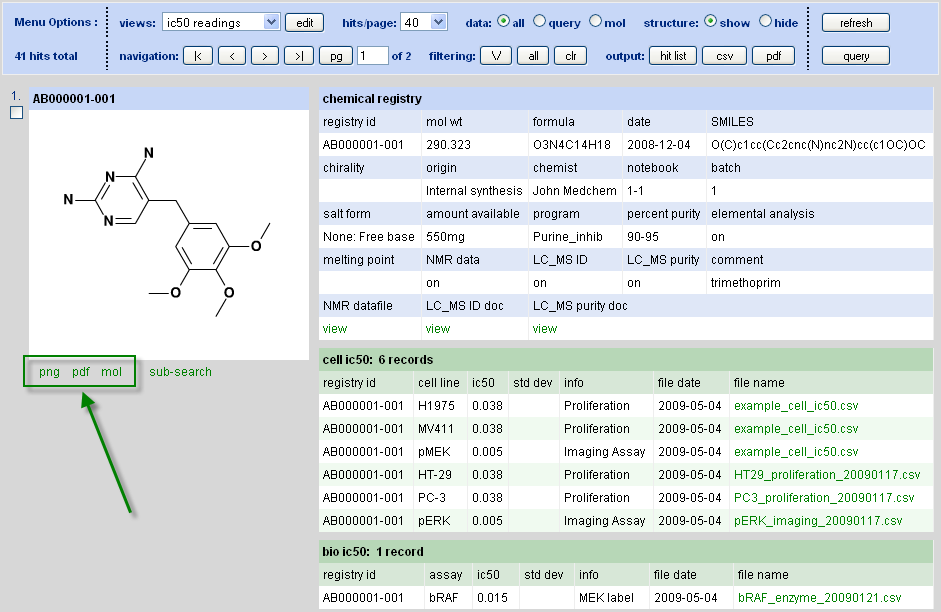
Options for image generation via png, pdf, or mol file output are below the displayed structure.
Menu Options
The available menu options depend on which mode is being used and will be visible at the top of the page.
View selection
This dropdown select menu controls which data types (e.g. registry, cell IC50, mass spec protein id, etc.) will be displayed following a database search as well as the subset of fields for that data type. There are three defaults, chemistry, biology, and everything. Additionally, as many custom views as desired can be created using the EDIT VIEWS mode. When a new view is created and saved, it is added to the drop down menu.
Results or Hits per Page
When a search in run, the user is transferred to SEARCH mode to browse the data. The number of compounds to be shown at any one time along with their associated results are controlled by the results per page radio buttons. Note that the time for a search to execute is actually usually significantly less than the time to display results in the browser, so reducing the number of compounds to display at any one time will improve overall speed of search.
Data to Display
As indicated, when a search runs it generates a hit list of compound ids that pass the query. Those compounds pass because they had one or more experimental records that satisfied the query. When displaying data in SEARCH mode, one can show all the data that is available for a compound, or only the experimental records that satisfied the query, or only the molecular structure with no associated data displayed. These options are controlled by the data to display radio button. Note that the displayed data is still constrained by the view selection described above, and so between view selection and data to display, the results to be shown can be customized in detail.
Structures
Structures. Toggle to control whether molecular structures are shown or not.
Navigation
In SEARCH mode, this feature navigates the pages of data, with as indicated above, the total number of compounds shown for a given page controlled by the results per page radio button.
Filtering
Filtering allows registry ID hits for a search to be reduced via visual inspection. When results are shown in SEARCH mode, beside each registry ID shown is a checkbox. If the filter option is selected in the filtering portion of the menu, only compounds that have the filter checkbox checked, will be retained. The pick all option should be used if the user wants to save most of the compounds and discard a few, i.e. first pick all and then de select the compounds that are not of interest. The clear function de selects all filter checkboxes.
Output Options
Results from a search may be exported to either a hit list, set of csv files, or pdf. The hit list option displays the registry ID's from the search results in text format in a new window. If csv output is selected, there is one csv created per data type (registry, bio ic50, proteome etc.) that the user is currently displaying via the view selection choice. The reason for generating multiple csv's is to allow the field names for each data type to be used as headers in the csv file. Pdf output can be used to make a permanent copy of results from a given search or for printing. Note that computer memory issues may come into play if one attempts to generate a pdf for a very large set of search results, and so the search may need to be subdivided and rerun. For both the csv and PDF output, the general principle is to render whatever data are currently being shown as a result of menu and view selected options.
Edit Views
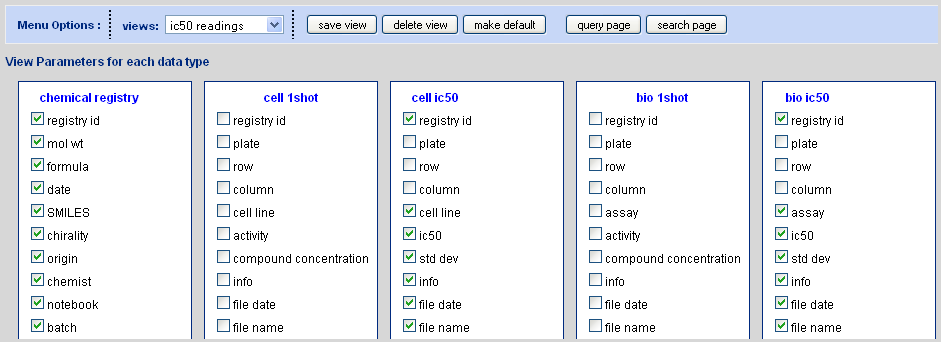
Transfer to the edit views mode via the edit command adjacent to the views dropdown menu. The edit views mode appears something analogous to what is shown in Figure 4.4, “Edit View Interface” (the exact view is specific to the organizations data types as done in the CB setup). Selecting a view from the view selection menu will automatically check certain checkboxes which correspond to the field names for each of the available data types. The selected checkboxes are the data that will be made visible when a search is run and this view is selected. Edit these as desired and then save to a new name or overwrite and existing view (the general chemical registry, biological data table, and everything views are write protected). The make default button causes the selected view to become the one that is loaded any time a new Chem Biography session is started.
Chapter 5. Biology Data Results Upload
Table of Contents
Initial Upload
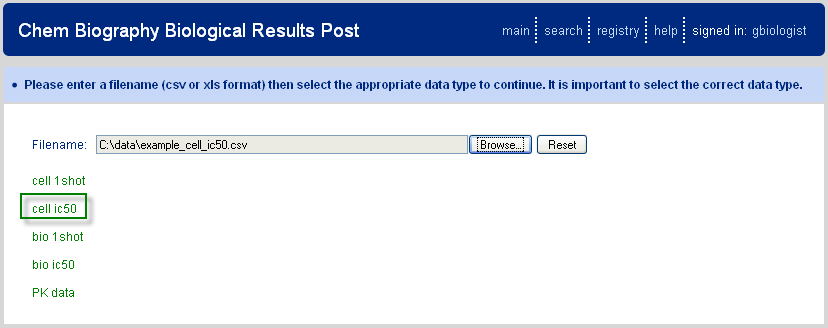
The final CB main page option is for posting of biological data and is designed for data recorded in CSV file format. Selection of this link transfers the user to the upload page as shown in Figure 5.1, “Upload Biological Results”. The user enters the filename of interest and then selects the type of data to be uploaded; options are derived, as for all other functions, from the CB data setup. Selecting the data type will then transfer the user to an intermediate analysis page.
Interim Analysis
The interim analysis does two principle actions. The first is to check the CSV file headers and compare them to the CB field names recorded for the data type of interest. If there are mismatches the user in notified. In the example shown below in Figure 10, the user had a “row#” column head which was not part of the CB setup. Note that the file can still be uploaded, but the missing column will not be loaded into the database since there is no matching field name (or alias). If this is an important column of interest contact the local administrator of CB to add the field name (or an alias) to the data type setup. This setup is discussed in detail in the final section on administration of CB.
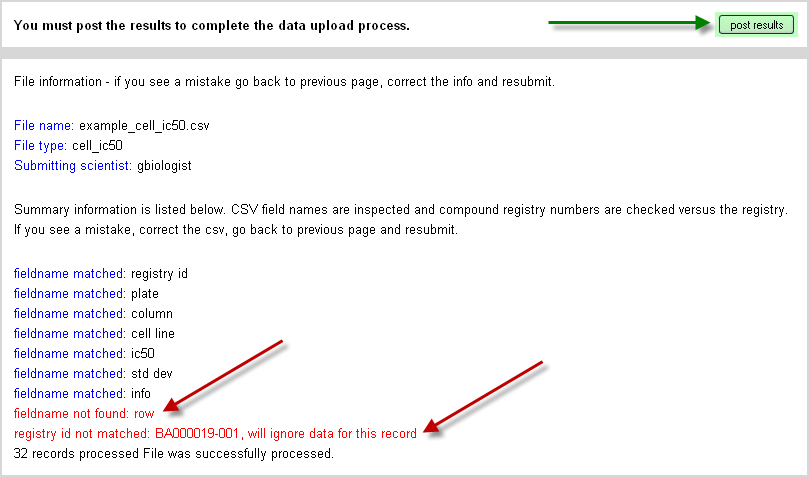
The second action performed during the interim analysis is to verify that registry numbers are consistent with what is found in the database. All uploaded biological data files must have a column referencing the registry ID (or an alias) to allow mapping of the data. This column entry is checked against the registry. In the example shown in Figure 5.2, “Interim Analysis Page for Posting Biological Results”, one registry ID was inadvertently switched. It would be in principle corrected and the file re-uploaded.
Final Submission
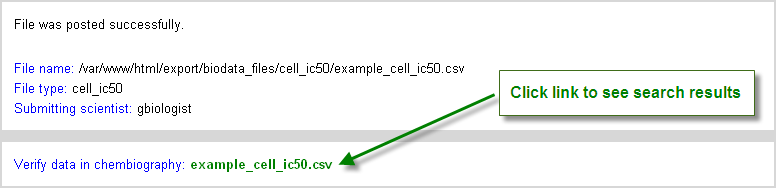
Once the user is satisfied that the file is satisfactorily prepared, based on the analysis, the results are posted. Note that this step must be completed to fully upload the data. The user is directed to a summary page that provides a link to the data now uploaded in CB (Figure 5.3, “Indication of Upload Success after post results button click”). Clicking on the link will transfer the user to the search results page where the data can be verified as having been posted.
List of Figures
- 1.1. Chem Biography Main Menu
- 2.1. Chemical Registry Front Page
- 2.2. Example Populated Registry Form
- 2.3. Example Registered Molecule
- 2.4. Upload Analytical Data Files
- 2.5. Edit Existing Molecule Select
- 3.1. J2A Chemical Editor
- 4.1. Chem Biography Search Input Page
- 4.2. Atom #s toggled "on"
- 4.3. Chem Biography Search Results Detail
- 4.4. Edit View Interface
- 5.1. Upload Biological Results
- 5.2. Interim Analysis Page for Posting Biological Results
- 5.3. Indication of Upload Success after post results button click
List of Tables
- 4.1. Multiple Atom Type Examples
- 4.2. Bond Wildcard Types
- 4.3. Bond Wildcard Examples
- 4.4. Registry ID Shortcuts
- 4.5. Query Examples
- 4.6. Registry shorthand allowed on data query
- 4.7. Chemical Registry
- 4.8. Cell IC50 Assays
- 4.9. Search Examples